GAN 아키텍쳐를 이용하여 MNIST 데이터셋을 학습시켜 새로운 손글씨 데이터를 생성하는 모델을 구현하였다. Dataset을 불러오고 전처리하는 코드, model를 정의하는 코드, 실제 학습을 진행하는 코드로 기능을 나누어 설계하였다. 현재 Pytorch를 공부하고 있는 입장이므로, 코드 한줄마다 자세한 설명을 담아 포스팅을 작성하였다.
관련 포스팅
다음 자료를 참고하여 작성하였습니다.
0. Util 함수 정의
필요한 패키지 import
1
2
3
4
5
6
7
import matplotlib.pyplot as plt
import numpy as np
import torch
import seaborn as sns
from PIL import Image
import imageio
import os
Seaborn 패키지는 Matplotlib을 기반으로 다양한 테마와 챠트를 제공하는 시각화 패키지이다. Imageio 패키지는 gif 파일을 만들기 위해 사용하였다.
이미지 출력 함수
1
2
3
4
5
6
7
8
9
10
11
def imshow(img, epoch, filename):
    img = img / 2 + 0.5
    npimg = img.detach().cpu().numpy()
    plt.figure(figsize=(7, 7))
    plt.imshow(np.transpose(npimg, (1, 2, 0)))
    plt.title("Epoch {}".format(epoch+1))
    plt.tight_layout()
    plt.show(block=False)
    plt.savefig(filename)
    plt.pause(2)
    plt.close()
특정 epoch에서 generator에 의해 생성된 손글씨 이미지를 출력하기 위해 사용한다. detach()는 기존 tensor에서 gradient 전파가 안되는 tensor로 얕은 복사를 수행한다. 학습에 방해가 되지 않도록 2초간 이미지를 출력하고 팝업 창이 닫히도록 plt.pause(2), plt.close()를 추가하였다.
모델 저장
1
2
3
4
5
6
7
8
def save_checkpoint(model_list, filename):
    model_state = []
    for m in model_list:
        model_state.append(m.state_dict())
    state = {
        'model_state' : model_state,
    }
    torch.save(state, filename)
학습이 끝까지 완료되었을 때, 혹은 학습 중간의 model_list에 있는 모든 모델의 파라미터 값을 저장한다.
학습 그래프 출력 및 저장
1
2
3
4
5
6
7
8
9
10
11
12
13
14
15
16
17
18
19
20
21
22
23
24
25
26
27
28
29
30
31
32
33
34
35
36
37
38
def loss_graph(gen_loss_list, dis_loss_list, filename):
    sns.set()
    plt.figure(figsize=(7, 7))

    plt.subplot(2, 1, 1)
    plt.plot(dis_loss_list)
    plt.legend('dis')
    plt.title("Discriminator loss")
    plt.xlabel("epoch")
    plt.ylabel("loss")

    plt.subplot(2, 1, 2)
    plt.plot(gen_loss_list)
    plt.legend('gen')
    plt.title("Generator loss")
    plt.xlabel("epoch")
    plt.ylabel("loss")

    plt.tight_layout()
    plt.savefig(filename)
    plt.show()


def pred_graph(real_pred_list, fake_pred_list, filename):
    sns.set()
    plt.figure(figsize=(7, 4))

    pred_list = np.vstack((real_pred_list, fake_pred_list)).T

    plt.plot(pred_list)
    plt.legend(['real', 'fake'])
    plt.title("Discriminator prediction")
    plt.xlabel("epoch")
    plt.ylabel("loss")

    plt.tight_layout()
    plt.savefig(filename)
    plt.show()
Generator와 discriminator의 loss 값을 나타내는 그래프와, discriminator가 real data와 fake data를 예측하는 확률 값을 나타내는 그래프를 출력하고 저장한다.
Gif 파일 생성
1
2
3
4
5
def generate_gif(path, filename):
    path_list = [path+f"/{i}" for i in os.listdir(path)]
    path_list.sort(key=lambda x : int(x[19:-4]))
    image_list = [Image.open(i) for i in path_list]
    imageio.mimsave(filename, image_list, fps=2.0)
Epoch에 따라 GAN 모델이 생성한 손글씨 데이터의 변화를 나타낸 gif 파일을 생성한다.
1. Dataset 불러오기
1
2
3
4
5
6
7
8
9
10
11
12
13
from torchvision import datasets
from torch.utils.data import DataLoader
import torchvision.transforms as transforms
import util

DATA_PATH = "./dataset_MNIST"
batch_size = 64

transform = transforms.Compose([transforms.ToTensor(),
                                transforms.Normalize((0.5,), (0.5,))])

train_data = datasets.MNIST(root=DATA_PATH, train=True, download=True, transform=transform)
train_loader = DataLoader(dataset=train_data, batch_size=batch_size, shuffle=True, drop_last=True)
torchvision.transforms는 이미지 데이터를 변형하는 메소드가 담겨있는 패키지로, transforms.Compose()를 이용해 변환을 합성하여 사용할 수 있다. 여기서는 이미지 데이터를 tensor 자료형으로 바꿔주는 ToTensor() 변환과 픽셀 데이터를 평균 $m=0.5$, 표준편차 $\sigma=0.5$로 바꿔주는 Normalize() 변환을 사용하였다. 원래 MNIST 데이터셋의 자료 범위는 $[0, 1]$이므로 $\frac{X-m}{\sigma}$에 의해 $[-1, 1]$ 범위로 변환된다.
datasets.MNIST()는 MNIST 데이터셋를 불러오고 transform을 적용해준다. download=True parameter는 root에 데이터셋이 없으면 자동으로 다운로드 해주는 옵션이다.
torch.utils.data.DataLoader는 dataset을 batch 크기에 맞춰 데이터를 묶고, shuffle하는 기능을 제공해주는 iterator이다. drop_last=True로 설정하여 batch 크기 데이터를 묶은 후 남은 나머지는 버려준다.
2. Model 정의
구현 세부 사항은 다음을 참고하였다.
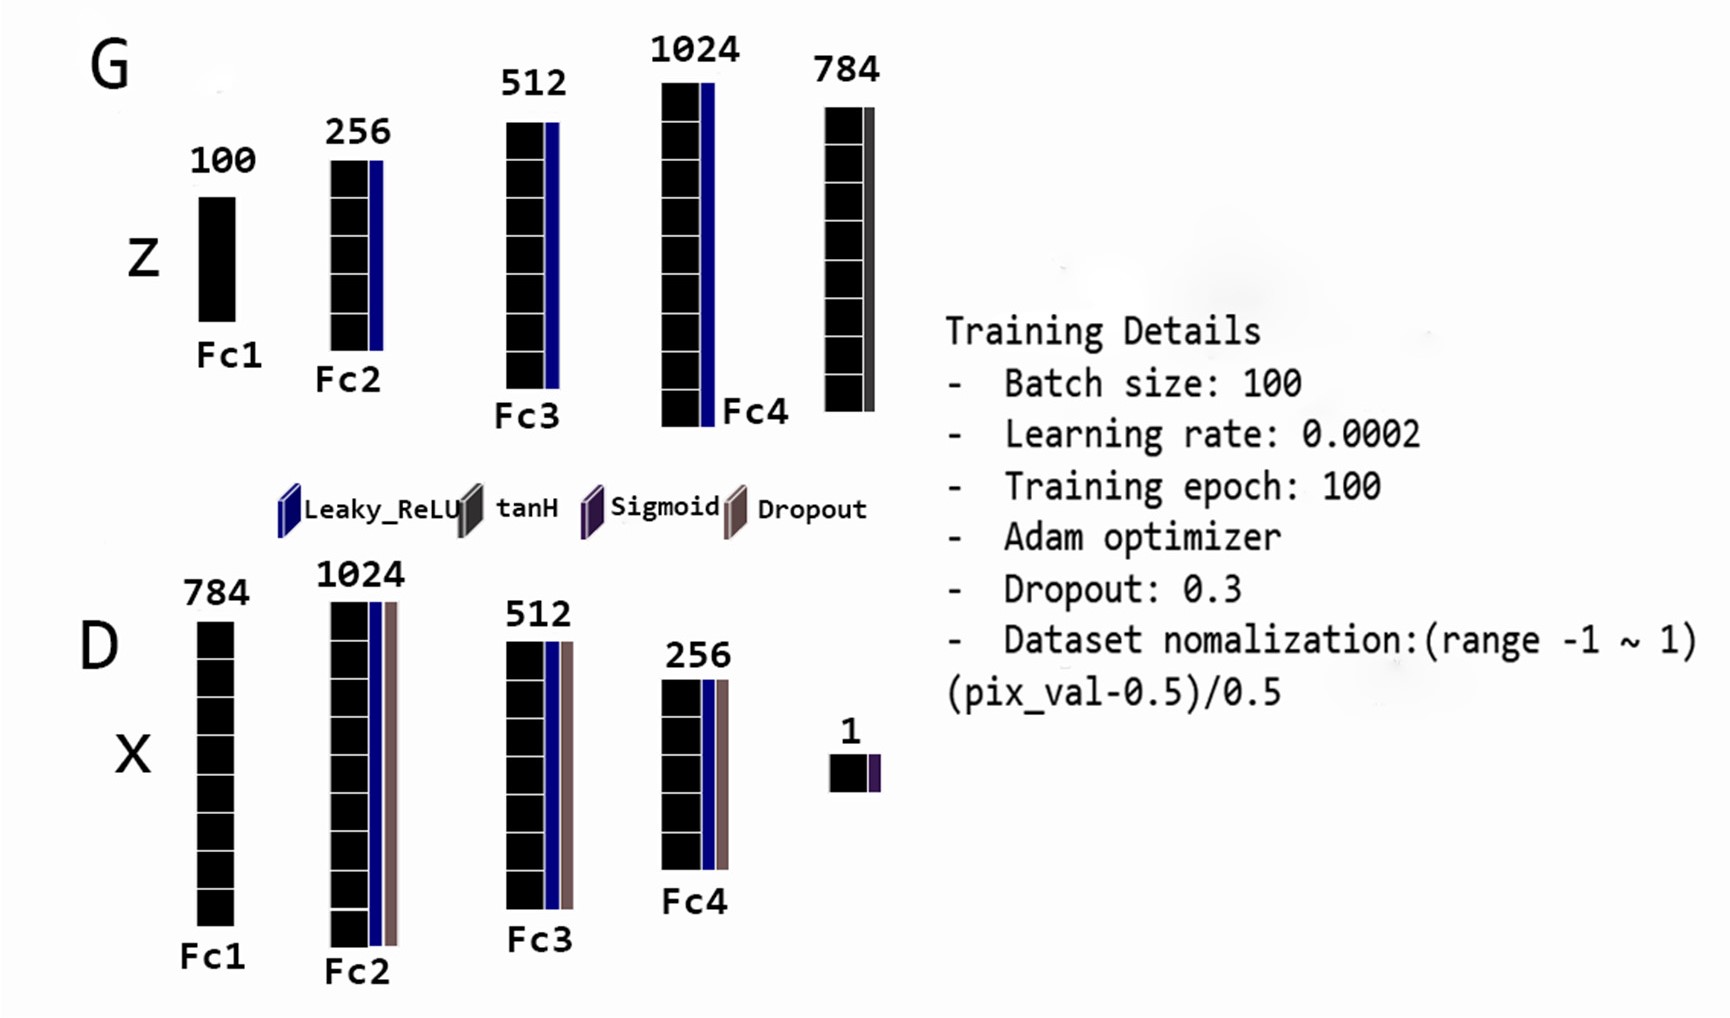 출처: Generation of Handwritten Numbers Using Generative Adversarial Networks
Hyper parameter에서 약간의 차이가 있다. 본 코드에서는 batch_size=64, training epoch=200를 사용하였다. Latent space의 dimension은 100으로 하였다. 또한 generator에서 Leaky_ReLU 대신 ReLU 함수를 적용하였다.
마지막 레이어에 활성 함수로 tanh 함수나 sigmoid 함수를 사용하는 이유는 출력 값의 특성 때문이다. Generator는 새로운 이미지 데이터를 생성하는 모델이므로, 출력 범위를 normalize한 입력 범위와 동일한 $[-1, 1]$로 맞추기 위해 tanh를 사용한다. Discriminator는 주어진 데이터가 real data일 확률을 출력하는 모델이므로, 출력 범위를 $[0, 1]$로 맞추기 위해 sigmoid 함수를 사용한다. ReLU 함수는 상한이 존재하지 않으므로 마지막 레이어에 활성 함수로 사용할 수 없다.
Generator 구현
1
2
3
4
5
6
7
8
9
10
11
12
13
14
15
16
17
18
19
import torch.nn as nn

class Gen(nn.Module):
    def __init__(self, latent_dim, hidden_dim, image_size):
        super(Gen, self).__init__()
        model = []
        model.extend([nn.Linear(latent_dim, hidden_dim),
                      nn.ReLU(inplace=True)])
        model.extend([nn.Linear(hidden_dim, hidden_dim*2),
                      nn.ReLU(inplace=True)])
        model.extend([nn.Linear(hidden_dim*2, hidden_dim*4),
                      nn.ReLU(inplace=True)])
        model.append(nn.Linear(hidden_dim*4, image_size))
        model.append(nn.Tanh())

        self.model = nn.Sequential(*model)

    def forward(self, x):
        return self.model(x)
Discriminator 구현
1
2
3
4
5
6
7
8
9
10
11
12
13
14
15
16
17
18
19
20
class Dis(nn.Module):
    def __init__(self, image_size, hidden_dim):
        super(Dis, self).__init__()
        model = []
        model.extend([nn.Linear(image_size, hidden_dim*4),
                      nn.LeakyReLU(0.2),
                      nn.Dropout(0.3, inplace=True)])
        model.extend([nn.Linear(hidden_dim*4, hidden_dim*2),
                      nn.LeakyReLU(0.2),
                      nn.Dropout(0.3, inplace=True)])
        model.extend([nn.Linear(hidden_dim*2, hidden_dim),
                      nn.LeakyReLU(0.2),
                      nn.Dropout(0.3, inplace=True)])
        model.append(nn.Linear(hidden_dim, 1))
        model.append(nn.Sigmoid())

        self.model = nn.Sequential(*model)

    def forward(self, x):
        return self.model(x)
torch.nn.Module를 상속하여 구현한다. Latent dimension, hidden dimension, image size를 parameter로 받는다.
레이어 구조를 출력해보면 다음과 같다.
1
2
3
4
5
if __name__ == "__main__":
    generator = Gen(100, 256, 28*28)
    discriminator = Dis(28*28, 256)
    print(generator)
    print(discriminator)
1
2
3
4
5
6
7
8
9
10
11
12
13
14
15
16
17
18
19
20
21
22
23
24
25
26
27
Gen(
  (model): Sequential(
    (0): Linear(in_features=100, out_features=256, bias=True)
    (1): ReLU(inplace=True)
    (2): Linear(in_features=256, out_features=512, bias=True)
    (3): ReLU(inplace=True)
    (4): Linear(in_features=512, out_features=1024, bias=True)
    (5): ReLU(inplace=True)
    (6): Linear(in_features=1024, out_features=784, bias=True)
    (7): Tanh()
  )
)
Dis(
  (model): Sequential(
    (0): Linear(in_features=784, out_features=1024, bias=True)
    (1): LeakyReLU(negative_slope=0.2)
    (2): Dropout(p=0.3, inplace=True)
    (3): Linear(in_features=1024, out_features=512, bias=True)
    (4): LeakyReLU(negative_slope=0.2)
    (5): Dropout(p=0.3, inplace=True)
    (6): Linear(in_features=512, out_features=256, bias=True)
    (7): LeakyReLU(negative_slope=0.2)
    (8): Dropout(p=0.3, inplace=True)
    (9): Linear(in_features=256, out_features=1, bias=True)
    (10): Sigmoid()
  )
)
3. 학습
필요한 패키지 import 및 메모리 초기화
1
2
3
4
5
6
7
8
9
import torch
import torch.nn as nn
from torchvision.utils import make_grid
import dataset, model, util
import gc

gc.collect()
if torch.cuda.is_available():
    torch.cuda.empty_cache()
Hyper parameter 정의
1
2
3
4
5
6
7
8
9
10
11
12
13
14
15
RESULT_DIR = "./result"
DEVICE = "cuda" if torch.cuda.is_available() else "cpu"
batch_size = 64
n_epoches = 200
latent_dim = 100
hidden_dim = 256
image_size = 28*28
learning_rate = 2e-4
fixed_z = torch.randn(batch_size, latent_dim).to(DEVICE)
ones = torch.ones(batch_size, 1).to(DEVICE)
zeros = torch.zeros(batch_size, 1).to(DEVICE)
gen_loss_list = []
dis_loss_list = []
real_pred_list = []
fake_pred_list = []
fixed_z는 latent space에서의 고정된 데이터에 대하여 학습이 진행됨에 따라 generator가 생성하는 이미지의 변화를 관찰하기 위해 사용하는 값이다.
Model, optimizer, loss function, dataloader 선언
1
2
3
4
5
6
gen = model.Gen(latent_dim, hidden_dim, image_size).to(DEVICE)
dis = model.Dis(image_size, hidden_dim).to(DEVICE)
op_gen = torch.optim.Adam(gen.parameters(), lr=learning_rate, betas=(0.5, 0.999))
op_dis = torch.optim.Adam(dis.parameters(), lr=learning_rate, betas=(0.5, 0.999))
loss_func = nn.BCELoss()
train_loader = dataset.train_loader
nn.BCELoss()는 $l_n = -\left[y_n \cdot \log x_n + (1 - y_n) \cdot \log (1 - x_n)\right]$로 정의되는 loss function이다.
학습 진행
1
2
3
4
5
6
7
8
9
10
11
12
13
14
15
16
17
18
19
20
21
22
23
24
25
26
27
28
29
30
31
32
33
34
35
36
37
38
39
40
41
42
43
44
45
46
47
48
49
50
51
52
53
54
for epoch in range(n_epoches):
    gen.train()
    dis.train()
    for images, _ in train_loader:
        images = images.reshape(batch_size, -1).to(DEVICE)

        #generator loss
        gen.zero_grad()
        z = torch.randn(batch_size, latent_dim).to(DEVICE)
        fake_images = gen(z)
        fake_pred = dis(fake_images)

        gen_loss = loss_func(fake_pred, ones)
        gen_loss.backward()
        op_gen.step()

        #discriminator loss
        dis.zero_grad()
        real_pred = dis(images)
        dis_loss_real = loss_func(real_pred, ones)

        z = torch.randn(batch_size, latent_dim).to(DEVICE)
        fake_images = gen(z)
        fake_pred = dis(fake_images)
        dis_loss_fake = loss_func(fake_pred, zeros)

        dis_loss = dis_loss_real + dis_loss_fake
        dis_loss.backward()
        op_dis.step()


    with torch.autograd.no_grad():
        real_pred_mean = real_pred.mean()
        fake_pred_mean = fake_pred.mean()

        real_pred_list.append(real_pred_mean.item())
        fake_pred_list.append(fake_pred_mean.item())
        gen_loss_list.append(gen_loss.item())
        dis_loss_list.append(dis_loss.item())
        print(f'[Epoch {epoch+1}/{n_epoches}]')
        print(f'[Generator loss: {gen_loss.item()} | Discriminator loss: {dis_loss.item()}]')
        print(f'[real prediction: {real_pred_mean.item()} | fake_prediction: {fake_pred_mean.item()}]')
        print()

        if (epoch+1) % 20 == 0 or epoch == 0:
            gen.eval()
            sample_images = gen(fixed_z)
            sample_images = sample_images.reshape(batch_size, 1, 28, 28)
            util.imshow(make_grid(sample_images), epoch, RESULT_DIR+"/gif/epoch {}.jpg".format(epoch+1))

util.save_checkpoint([gen, dis], RESULT_DIR+"/MNIST_gan.pt")
util.loss_graph(gen_loss_list, dis_loss_list, RESULT_DIR+"/loss_graph_gan.jpg")
util.pred_graph(real_pred_list, fake_pred_list, RESULT_DIR+"/prediction_gan.jpg")
util.generate_gif(RESULT_DIR+"/gif", RESULT_DIR+"/gif_gan.gif")
gen.train(), gen.eval()는 각각 모델을 train 모드와 evaluation 모드로 변경한다. Evaluation 모드에서는 dropout, batch normalization와 같이 학습할 때만 적용해야하는 레이어 기능을 비활성화 시킨다. gen.zero_grad()는 역전파 과정을 실행하기 전 각 parameter의 gradient를 0으로 초기화한다. 모델의 가중치를 갱신하기 전에 적용한다.
Channel 수가 1인 28 * 28 사이즈의 이미지 데이터를 1차원 데이터로 flatten하여 모델에 대입해주기 위해 reshape(batch_size, -1)를 적용해준다.
Generator는 원래 목적 함수 $\log (1-D(G(z)))$를 최소화하여야 한다. 그러나 원 논문의 3. Adversarial nets 3번째 문단을 보면, $\log D(G(z))$를 최대화하도록 학습하는 편이 더 좋은 결과를 낳는다고 설명한다.
Rather than training $G$ to minimize $\log (1-D(G(z)))$ we can train $G$ to maximize $\log D(G(z))$. This objective function results in the same fixed point of the dynamics of $G$ and $D$ but provides much stronger gradients early in learning.
따라서 $BCELoss(D(G(z)), 1) = - \log D(G(z))$를 최소화하도록 generator를 학습한다.
마찬가지로 Discriminator는 목적 함수 $\log D(x) + \log (1-D(G(z)))$를 최대화하여야 하므로 $BCELoss(D(x), 1) + BCELoss(D(G(z)), 0)$를 최소화하도록 학습한다.
매 epoch마다 generator와 discriminator의 loss를 출력하고 리스트에 저장한다. 또한 real data와 fake data에 대한 discriminator의 예측을 batch 단위로 평균내어 출력하고 리스트에 저장한다. 20 epoch마다 고정된 latent data를 generator에 입력하여 출력되는 새로운 손글씨 데이터를 저장한다.
학습을 완료한 후 모델과 학습 그래프를 저장하고, gif 이미지를 생성한다.
4. 결과
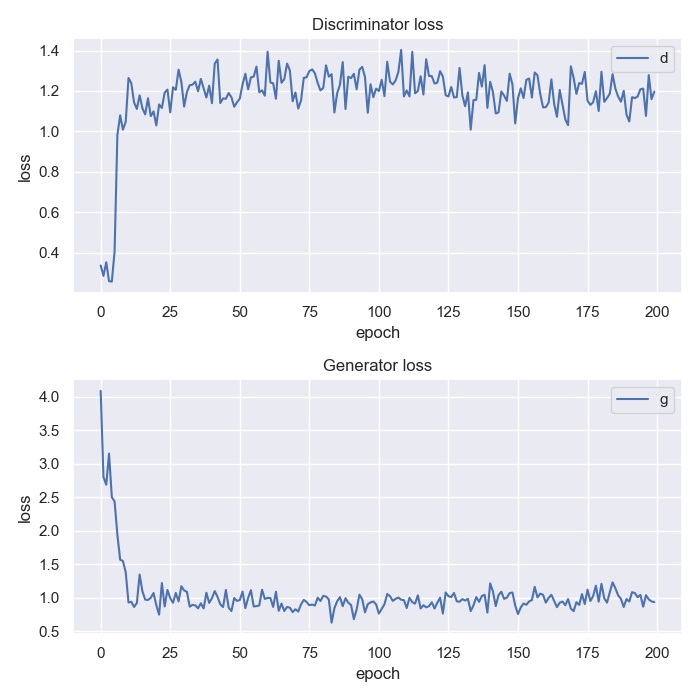 Loss 값이 감소하는 것이 잘 관찰되지 않는다.
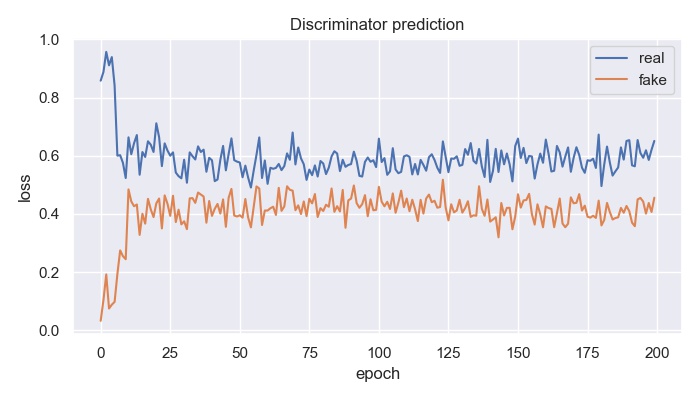 이론적으로는 prediction 값이 0.5로 수렴해야하나, 이 역시 잘 관찰되지 않는다.
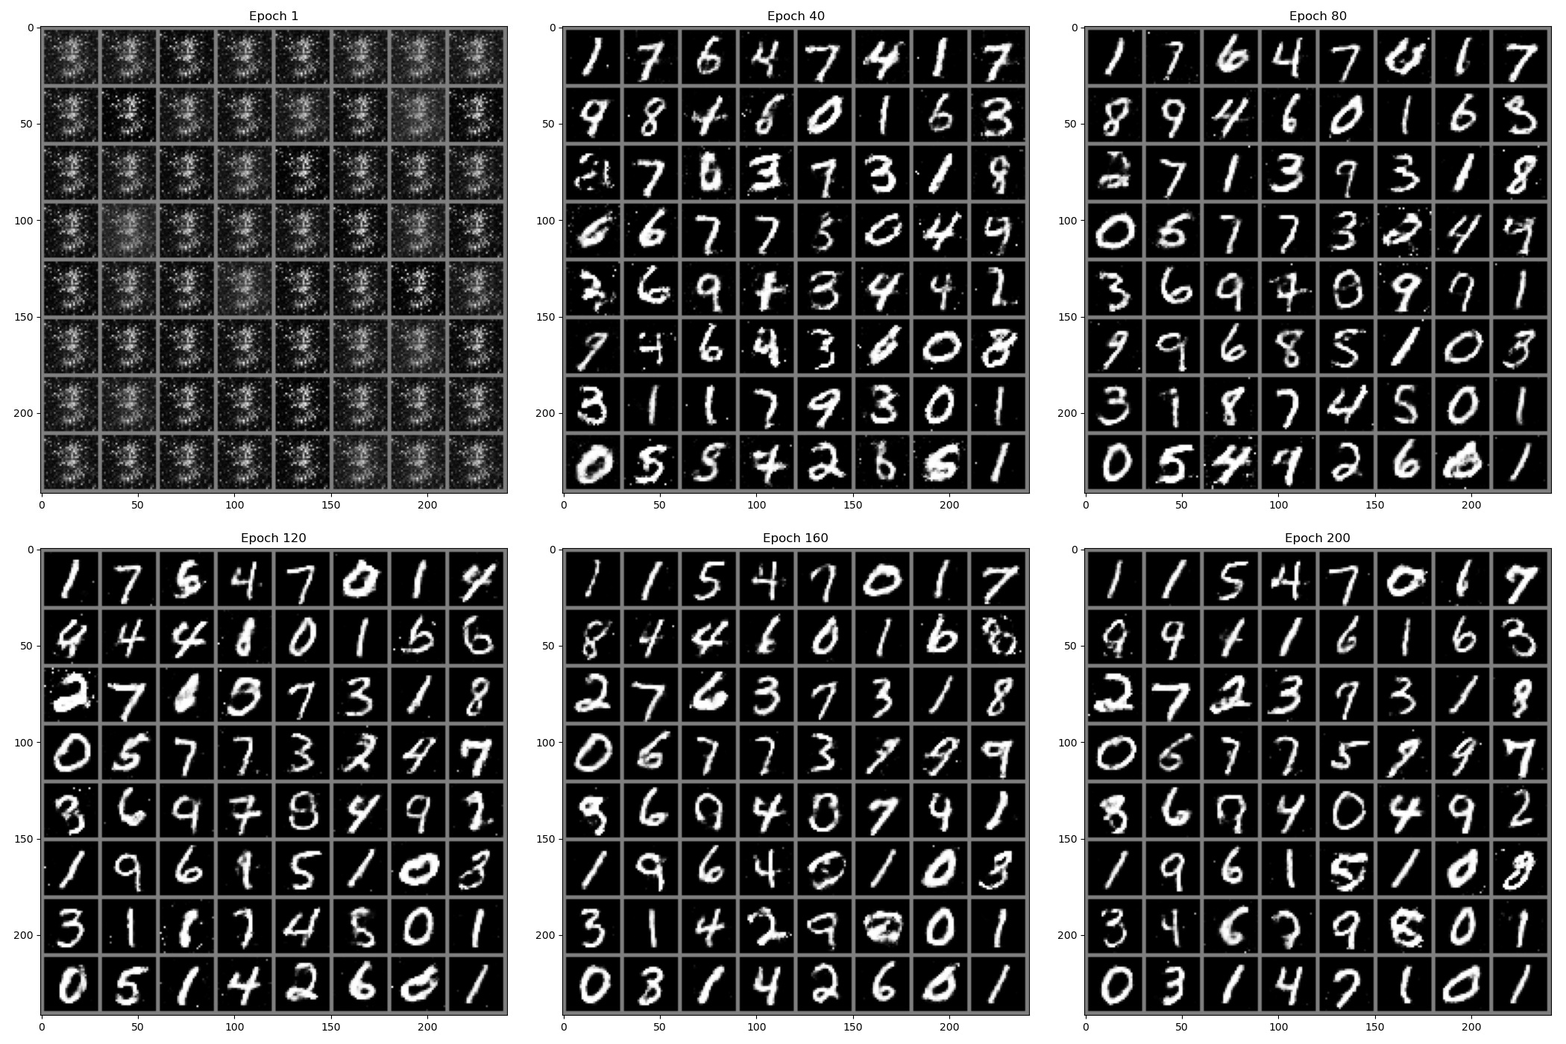 20 epoch 별로 나타낸 새로운 손글씨 데이터
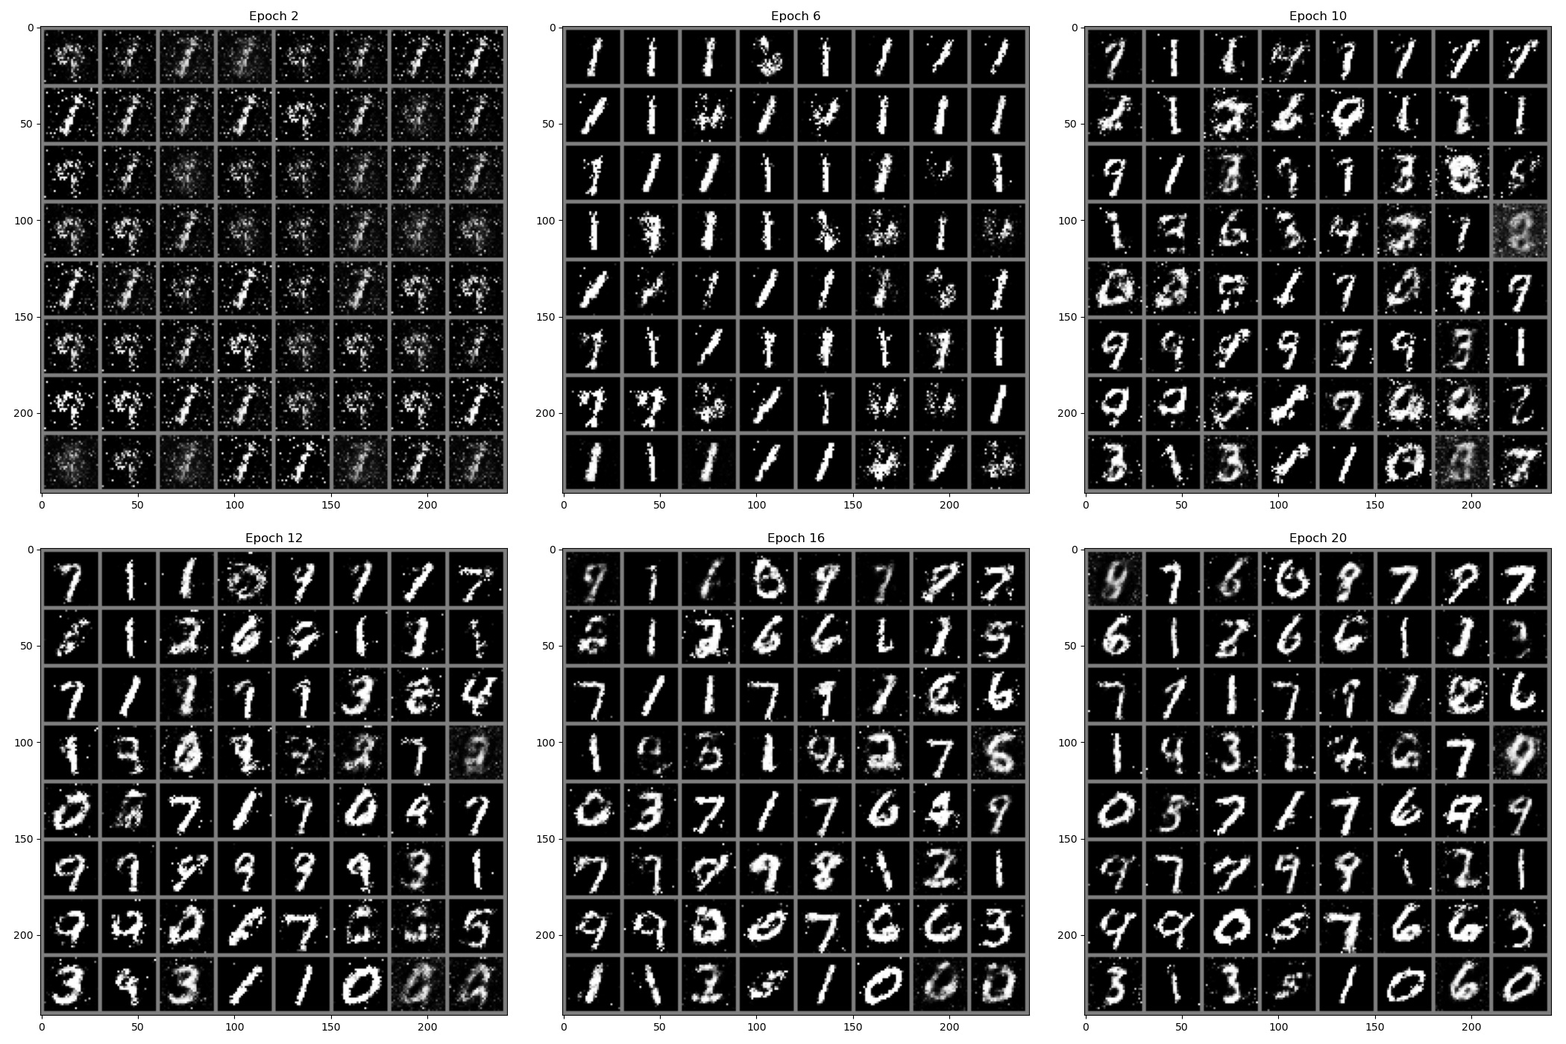 초반 학습에서 새로운 손글씨 데이터 변화
전체적으로 수렴이 잘 진행되지 않는다. Loss 값이나 prediction 값이 전 epoch에 걸쳐 잘 변하지 않고, 학습 종료 후 생성된 데이터와 초반부 학습 때 생성된 데이터가 별반 달라보이지 않는다. 이러한 한계점을 극복하여 성능을 향상시키고자 다양한 GAN 모델이 개발되었다. 그 중에서, 다음 포스팅은 이미지 데이터 학습에 유리한 DCGAN과 CGAN에 대해 정리해볼 것이다.
